Sunday, December 12, 2010

Anyone can cook.

Regarding the aforementioned Ratatouille in last night's post, allow me to be succinct.


IT. WAS. ABSOLUTELY. AMAZING!


It was nearly as perfect as it could have been.  And guess what made it?  Surprisingly, the lemon juice.  If it wasn't for the lemon juice, this wouldn't have been nearly as good.


I'm lucky I had extra lemons.

Saturday, December 11, 2010

"What are you doing??" -- "Uh... vegetables. I'm cooking the... vegetables?"

See!  I added more color to my repertoire!  So, mes chéris, I DO improve.  And, just guess what we've concocted up this time??


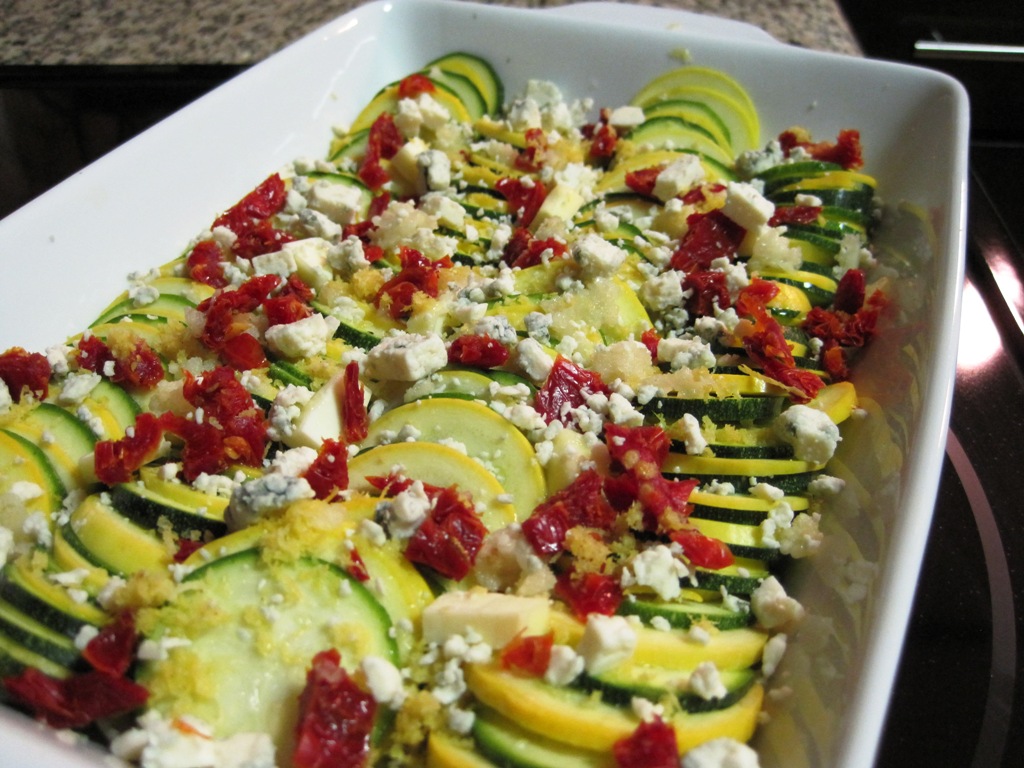
If you couldn't guess it from this picture, shame on you.  Granted, it is a Kitty-ized version (me), but still - Ratatouille has a distinct look!  (In case you weren't tipped off by the title  ;)


I know, I said I was going to bake this week.  Well, sorry, best laid plans didn't happen.  Maybe pumpkin fudge tomorrow afternoon, to take to work on Monday... and I KNOW I will be baking next weekend, as my blanched almond flour is supposed to arrive on Thursday.  I can't wait!  (For all you out there, blanched almond flour = macarons.)
Also, in my defense, I didn't cook much this week, either.  Dinner consisted of salads (much like the earlier post of my breakfast salad), and broiled tofu (it was good!  but not photo-worthy.  Marinated in soy sauce, a little seasame oil, and lemon juice.).  I was pleasantly surprised.  


But, back to this week.


I bought squash (green and yellow zucchini) again this week, because it was on sale, it had a bit more color than "green", and when I made it for Thanksgiving, it was good.  But, all I did was sauté it in a wok until it was nearly carmelized mush, and season with salt and pepper.  It WAS delicious carmelized mush, though.  

This time, because I was feeling more creative, and I had both gorgonzola and bleu cheese in my fridge, I decided to spice it up.  And, I do love the lovely animated movie, Ratatouille.  

I started with three small yellow and two green zucchini, and sliced them just as thin as I could without much endangering my non-existent manicure.  Now, I understand that Ratatouille is supposed to have tomatoes, too.  The problem being, I hate fresh tomatoes.  Ketchup, Pasta Sauce, even Sun-dried tomatoes I can handle.  Fresh ones, or even chunky Pasta Sauce?  No go.  Nasty, disgusting little things.  So, I used sun-dried instead, and treated them as an accent.    

Then came the head of garlic (Mother - I know, it was only a head; I restrained myself.  All others - really, a whole head isn't that much garlic.  Jake - case in point; I can't be a vampire.).

And, because I had three fresh lemons that were starting to age, I added half the juice of one lemon, and dusted with lemon-zest.  (I bought the lemons with the intent to use them in martini's.  Awesome reason, I know.)  

Next came the sprinkle of gorzonzola, a 1/2 tblsp of butter, salt and pepper, and voila.  

Tomorrow, after I come home from church, I will bake it at 350 until nice and tender, broil for a few minutes to give it a nice brown sheen, take a picture, and enjoy some of it for lunch.  I will post pictures.  


Isn't it pretty, though?


I think so.  I'll let you know how delicious it is.

Sunday, December 5, 2010

No, my favorite color is NOT green.

That wasn't meant to be a reoccurring trend either - is it my fault most of the veggies out there are greenish hued? It's just a result of our surroundings.


Either way, lunch yesterday consisted of a Cucumber Salad. Doesn't it look so nice and refreshing?


So the recipe was simple, basically it was 2 cucumbers, 1 cup plain yoghurt, and 1 tsp dill. Well, a trend you WILL see is that I don't believe in following recipes. They're more like guidelines rather than rulebooks. I'm a firm believer that if you make something with love, and make intelligent adjustments, it'll all turn out okay. And people CAN tell the difference between something cooked when you're irritated and something cooked while you're enjoying every minute of it.


Well, I had many fresh herbs leftover from Thanksgiving, and I either had to use them NOW or start drying them, because they weren't going to last much longer. So the 1 tsp of herbs turned into 1/2 cup of Rosemary, Oregano, Sage, and Thyme. Dusted with salt and pepper, and you're ready to go.


It reminded me of home, actually. Waking up before the sunrise to go for a 5 mile run up a mountain (because it's QUIET then and there's no risk of getting SUNBURNED), or a long walk in the hills behind our house when everything's green and growing.


It TASTED like that. Yeah, exactly.


So nothing that [a lot] more salt and pepper couldn't fix, but next time I think I'll follow the recipe a little closer.


In more recent news, since it was Sunday and I was allowed to have meat, and I'd bought two pounds of green beans the Friday prior, guess what I made?


As an afterthought, I think I tend to overdo things a bit. Because I ate half of that two-pound dish for lunch (granted, there's no calories in green beans - but there is in pancetta), and now I don't think I ever want to see/smell/taste it again.


But, it was delicious at the time, and everyone I've made it for has liked it.... I just don't think I'll be making it again for me any time soon. Bleh. On a positive note, that means I don't have to buy cured meat for $20 per pound anymore either.


Recipe!
1 lb green beans
3 oz Pancetta
2-3 shallots


Blanche the green beans in boiling saltwater for 3-4 minutes, and then immediately strain and douse in ice water to stop the cooking. If you don't, you'll be left with mushy green beans - you need to stop the cooking.


Cook the diced pancetta until crisp, and with a slotted spoon, transfer to a small bowl, leaving the fat in the pan. Add the shallots to the pan, and cook until golden brown (if the bottom starts to burn - add some water and stir. The water will evaporate, and should lift the 'almost-burnt' layer from your pan). Add the pancetta and strained green beans, stir for a few minutes until incorporated and warmed, and serve.


Voila. Works great as a light-er side dish to a meal, and has an almost-nutty flavor. Just try to avoid eating the entire pan.


This week, I have work, work, and work, and a "Continuing Students" info-session at the local university I'll be going to next semester, where I'm going to sign up for classes. Fun times. We'll see if I can't find some time to BAKE something somewhere in between.


And go shopping for more colorful veggies. We'll see what's on sale this week. Borscht, anyone?


Saturday, December 4, 2010

Cooking healthy - for One

Read: a carb-detox.


First, you will begin to notice a common trend here - everything starts with caffeine. In one form or another. This was caffeine fix #2 of the day.


Have I mentioned how much I love my Nespresso machine? Granted, one of my goals within the next month is to decrease my caffeine intake, but an Espresso Macchiato can never be substituted. This will always be a part of my weekend routine.


So, I have decided once again to get back to cooking. I know I've said this before - but I'm serious this time. Likely you will see a lot of vegetables, at least over the next month.


- Goal #1 - Eat better, and battle the carb-fest that is the holidays. And to get rid of these extra pounds and prevent future ones.


- Goal #2 - In proper Advent fashion, attempt to be a quasi-vegetarian and Alcohol-free, from now until Christmas. If you know me, this is harder than it sounds. I enjoy my Friday-night glass of wine (I don't drink during the week), and love my meat.


- Goal #3 - Build my basic cooking skills, to a point where I may actually drop $20 grand to go to Culinary school.


So, because last night was a carb frenzy (I finished the Thanksgiving Stuffing), breakfast today was a salad.


It's greens/dried-berries/gorgonzola/dried-tomato/merlot-raspberry-vinaigrette could only have been made better by diced prosciutto. Which is in my fridge next to the pancetta. See goal #2. T-21 days and counting.


I do love my camera, though.


And yes, to Goal #3, it may actually be a potential future option. I have every intention of FINDING THINGS TO DO IN TAMPA. It's going to start with Ballet again (read: under-optioned and overpriced), taking classes at University of Tampa (Finance and Marketing - I love numbers, but these are NOT my strong suits), volunteering at the Children's hospital (as a "Baby-holder" - I know, you're jealous - but it doesn't start until JANUARY), and trying to find serious cooking classes that jive with a full-time job (and don't require a second one to pay for).


Wish me luck.


Lunch today, with a future post and pictures - Cucumber herb salad.


Lunch tomorrow - Green beans with shallots and diced pancetta. Meat doesn't count on Sundays.

Monday, July 19, 2010

Another Cheesecake, and *gasp* something NOT in the baking realm!

Okay, so at least it only took me a few months to get back to baking. Since the last post, I have picked up and moved across the country - all the way across. I'm now in a very humid, very hot Tampa, FL. On the bright side - I have a beautiful apartment, with an unusually large kitchen. How do you think I picked out apartments?? =P (Check out my facebook page for pictures)

So, this first recipe, was actually baked a weekend before I left CA. A sort of "hurrah" before I left.

Individual blueberry cheesecakes - threw these together without a recipe, so I'm sorry. They worked out beautifully, though - basic cheesecake recipe, no flour, with homemade blueberry compote, baked in indiviual muffin tins with paper liners. They were delicious.


And the second item, is one of the first things I've made in my new kitchen. Not baking, but I'll get back to that soon enough. I need to make enough friends to be able to pawn the leftovers on them - I can have a whole dessert recipe sitting in my apartment. I don't work out enough for that. ;)

Meet roasted Asparagus with Balsamic Shallot Butter. I've decided I love shallots - they're amazing. They have a very special taste, without being too oniony - I still don't quite know how to describe them.


They taste better than they look, and make a delicious side dish. You have to eat them warm, though - I'm thinking of making them as a side dish for Thanksgiving, if I invest in a hot plate. You can't eat them cold.
- Two pounds of Asparagus
- 1.5-2 Tblsp Butter, melted
- 2 Tblsp Balsamic Vinegar
- 3 Tblsp shallots, finely chopped
- 1 tsp thyme
- 1/2 tsp lemon rind (if you don't have this, use something that has lemon rind - I used Ms. Dash. I'd recommend using the lemon rind, though)
Preheat oven to 450. Place asparagus on a greased pan, and cover with foil (I cook on foil too, so I don't have to wash the pan as much). Cook for 5 minutes, then uncover, and cook for 10 minutes more. While they're cooking, mix together the remaining ingredients with a whisk, and mix well.

Serve the sauce over the warm/hot asparagus - if you're saving for later, store the aspargus and sauce separately, reheat separately, and then pour sauce over the asparagus. It works - not *quite* as good as right out of the oven, but pretty darn close. Asparagus need to be eaten warm! If the sauce cools, it will turn slightly solid, due to the butter. Just reheat, and it will be good as new.

Both are quite delicious - just don't eat together. ;)

Saturday, April 24, 2010

The (somewhat) Triumphant returns!

Ahoy all! I'm back to baking and cooking, and now that I have a (somewhat) camera, I will be posting (most of) my escapades here for all to see!

While, I'm afraid to say, I don't have pictures of *all* of my baked/cooked items (pauses momentarily for the wails of dismay to disappate into the background), I do have the latest one!

Last week, I made three delicious items - Grilled Thai chicken salad with Mango and Ginger, Roasted asparagus with balsamic-shallot butter (I will NEVER look down my nose on asparagus again!), and a Strawberry cheesecake. And, of course, I only have a picture of the cheesecake. Shall we say single-focus brain, anyone?

So, as I sit here in my pajama's killing time before I have to text a friend (he was a cute one too, darnit) that I'm not going to be able to go to Renn Faire today after all, because I have to work for a few hours ( =( ), I will tell you about this marvelous cheesecake.


Disclaimer #1 - I am NOT responsible for the number of pounds one gains after having a slice (or two) of this beauty.

Claimer #2 - But I swear, it's worth every one.

On to the cheesecake! So at work two weeks ago, we had a major blowup relating to insufficient product for one of our customers. It was Thursday. We pulled our team together, and had to figure out how to get a product to California from Toronto, Canada. It needed to be there by Monday morning. And, the product was being produced on Friday, and it has a mandatory 8-day incubation time (and, we can't ship to customers on incubation). Totally screwed, anyone? After working with *everybody*, and finding an alternate item that we could repack (but we still needed packaging from Toronto), we throw together a potential solution. ~$2 grand later, it's actually going to work! At that point, I told everyone in the room that if we were able to do this, and get the customer product on time, I would bring in a cheesecake. Needless to say, we did, and so did I.

And now I'll stop blabbering.

Behold - the Cheesecake.


It is a Strawberry cheesecake, made with fresh Strawberries, and mascarpone cheese, of all things (I've never made a cheesecake with mascarpone before). The pictures don't do it justice, but it was heavenly. (Even though I broke Cheesecake Cardinal rule #3 - don't take the springform pan off until it's COMPLETELY cooled - it WAS a 9inch cheesecake. It was 10inches when I took it into work.)

And now for the recipe. It's from www.delish.com , which has had more jewels there than I expected for being one of the 'lesser' cooking sites. If only more of them were more waistline-friendly.

Next time I make this, which I will, I will be using a Vanilla bean - for my very first time!

· 1 pound(s) strawberries, hulled · 3 tablespoon(s) light corn syrup · 1 cup(s) finely ground graham crackers (about 4 sheets) · 1 cup(s) plus 3 tablespoons sugar · 3 tablespoon(s) unsalted butter, melted · 1 pound(s) plus 13 ounces cream cheese, room temperature · 1/4 teaspoon(s) salt · 2 large eggs, room temperature · 1 vanilla bean, seeds scraped and reserved · 8 1/4 ounce(s) mascarpone cheese, room temperature

Directions –

1 - Preheat oven to 300 degrees. Place strawberries in a single layer on a rimmed baking sheet. Drizzle with corn syrup, and toss gently to coat. Bake until syrup thickens and strawberries turn deep red and shrink slightly, about 1 hour 30 minutes. Transfer strawberries and syrup to a medium bowl, and mash with a potato masher. Let cool completely. 2 - Raise oven temperature to 350 degrees. Stir together graham cracker crumbs, 3 tablespoons sugar, and the melted butter in a small bowl. Press mixture into the bottom of a 9-inch springform pan to make an even layer. Bake until crust is firm to the touch and has just darkened, about 10 minutes. Transfer pan to a wire rack, and let crust cool completely. 3 - Reduce oven temperature to 325 degrees. Put cream cheese into the bowl of an electric mixer fitted with the paddle attachment; mix on medium-low speed until creamy, about 2 minutes. Scrape down sides of bowl, then gradually add remaining cup sugar and the salt. Scrape down sides of bowl; add eggs, 1 at a time, mixing well after each addition. Scrape down sides of bowl, and mix in vanilla bean seeds and mascarpone until very creamy and no lumps remain, about 3 minutes. (Reserve vanilla bean for another use.) 4 - Transfer 5 cups cream cheese mixture to bowl with mashed strawberries; stir to combine. Pour strawberry-cream cheese mixture on top of crust; smooth with an offset spatula. Carefully spoon dollops of plain cream cheese mixture on top, smoothing with an offset spatula. 5 - Wrap the exterior of the springform pan in 2 layers of foil; set in a large roasting pan. Fill roasting pan with boiling water until water reaches halfway up the sides of the springform pan. Bake cheesecake until set, about 1 hour to 1 hour 10 minutes. Remove springform pan from water bath, and transfer to a wire rack to cool. Refrigerate until cold, at least 4 hours (up to overnight).


And voila! Like magic, it’s delicious, and everyone who tries it will be wondering where you’ve been all their life. Or something like that.

Thursday, June 12, 2008

Fruit - The [Expensive] Harbinger of Summer

So I've been lax in posting. I know! I've been interviewing, weighing job offers, reading Non-School books, and baking! I've just been too lazy to document it. ;)

But I'm back! Alive and kicking, I'm afraid. Although, and don't hate me for this.... I made Weeva's Apple Pie Blondies , another set of Apple Pie Macarons and Oatmeal-Coconut-Corn Syrup cookies, and I don't have pictures!

I'm sorry, really I am.... But I do have three other recipes, so you'll forgive me, right? =)

However, first things first - 1. I got a job at Nestle! But, I don't begin till August, so I'll have plenty of time to bake and such between now and then. 2. I'm going to Cancun! For 5 days this summer. Oh boy! Expect pictures from that. 3. I quit my other job! So now I have extra time for baking. And finding apartments, and moving, and all that jazz.

But, back to the baking!

A couple weeks ago, Blackberries were on sale, and I bought Tartlette pans (mini tart pans) - the finished product of magnificent.


Pretty pretty, no?

Aaannndd.... This past Sunday night, I made Cherry Pie Bars...


Not as good as I wanted them to be, but still okay.


And, last night, I made a Cherry Cake. This, was fairly magnificent, as far as cakes go. It was my last day at work - and I figured I'd go out with a bang (something to be remembered by!).


It's absolutely amazing what you can do when you mix the creativity of two Bakeresses. (Weeva and I were brainstorming!)

So, being me, I only have the recipe for the last one (the Cherry Cake), because the first one is just a Vinegar pie crust with a Cream cheese/Heavy Cream/lemon juice filling, and the second I don't remember, and I'd like to modify the recipe before I give it to anyone else.


The Cherry Cake is comprised of three Parts: Cake, Filling, and Frosting.
The Frosting is the hands down best frosting I've ever made in my entire life. The filling is good - Next time, I'd add a little marsala or kiersh to give it a little more flavor. The cake could be better- Next time, I'm going to use real cake flour, and substitute milk for Buttermilk or Yogurt.
Cake: - Taken from Allrecipes.com


2 3/4 cups sifted cake flour 4 teaspoons baking powder 3/4 teaspoon salt 4 egg whites 1 1/2 cups white sugar 3/4 cup butter 1 cup milk (Use buttermilk/yogurt instead!) 1 teaspoon vanilla extract 1 teaspoon almond extract (I used 3/4)


Measure sifted flour, baking powder, and salt; sift together three times. In a mixing bowl, beat egg whites until foamy. Add 1/2 cup sugar gradually, and continue beating only until meringue will hold up in soft peaks. Cream butter or margarine. Gradually add remaining 1 cup sugar, and cream together until light and fluffy. Add sifted ingredients alternately with milk a small amount at a time, beating after each addition until smooth. Mix in flavorings. Add meringue, and beat thoroughly into batter. Spread batter into two 9 inch round pans which have been lined on the bottom with parchment paper. Bake at 350 degrees F (175 degrees C) for 30 to 35 minutes. Cool cake in pan 10 minutes, then remove from pan and transfer to a wire rack to finish cooling.

Filling: 2 lbs cherries (Or as many or few as you'd like) 3/4 cup sugar 2 tsp Vanilla 1 tblsp Corn Starch 2 tblsp Water
Pit cherries, and cut into fourths (I did - however, the fourths aren't mandatory). Put into a pan, and mix with ~2/3 cup sugar. Put on high heat until cherries have begun to release their juices - till almost boiling. Taste, and add remaining sugar if desired. Cook until juices start to thicken and almost cover cherries - 10-15 minutes. While these are cooking, in a small bowl mix Corn Starch and Water until smoothe. Pour 1 tsp at a time into the cherry mixture - this is to thicken the juice. Add Vanilla. Cook until a little thicker, ~5 minutes. Take off heat, and let cool.

Frosting: 3/4 Cup Butter 3/4 Cup Shortening 4.5 cups Powdered Sugar 1 tblsp Full fat Milk, Half and Half, or Heavy Cream (whatever is on hand with full fat)

Beat Shortening and Butter untill fluffy. Mix in Sugar. Add the milk/cream, and beat until smoothe and fluffy. Frost the cake!
Assembling: Level cakes if desired. Place one cake on the serving platter. Take frosting, and put a thin layer of frosting on top and sides. Make a "Sand bank" of frosting for the filling - so it doesn't seep through; about 1/4 inch high. Add about a cup of the filling, or as much as desired (and doesn't overflow). Put the second layer on, and lightly frost top and sides, to reduce crumbs in the main frosting. Frost the cake. Decorate as desired - I put most of the leftover cherry filling on the top, fairly-well insulated by frosting.

Voila!


Please note - I do not have links for the Filling and Frosting because they are my recipes. I know, strange as it may sound, I actually came up with them myself. =P